Monday, July 12, 2010

Princess Line Dress

This was the final project for my third quarter patternmaking class. We were to find a princess line dress to "knock off" using a sheath dress sloper as a starting point. Once again, I enlisted my girlfriend to find dresses she'd like.

We settled on this dress by the Japanese company Mary Magdalene.

Front

Back

The basic shape of the dress was easy to pattern, but the sleeves proved to be quite a challenge. They are essentially raglan sleeves that are elasticized at the shoulder and hem. I drafted them as actual sleeves with an underarm seam, and this made it more difficult than if I had just made them like really wide straps with no underarm seam.

Another interesting part was the center back panel. I put a seam at the waist of this panel, and the top section is a double thickness, with channels stitched across to accommodate the elastic. The elastic pieces were cut to a specific size and tacked at either end.

Everything else was pretty straightforward, just lots of lace and trim. There is a small invisible zipper at the waist on the left side seam. The dress is made of 100% cotton sateen. It is not lined, due to time constraints on construction.


Thursday, July 1, 2010

Alterations: Restyling Project

One of my most recent projects was a restyling project for my alterations class. We were assigned to make at least three alterations to an existed garment to give it a new look. I chose this blazer that my girlfriend has had in her closet for some time.


It didn't really fit her very well, particularly in the back and the bust. I took it in at the sides and added contour darts to the back to help with the fitting. For other styling changes, I shortened the sleeves to about elbow length and added black velvet cuffs, secured with silver buttons. I also added pocket flaps to the front patch pockets, secured with the same silver buttons. Black velvet ribbon trim was added to the collars and lapels, and I replaced the front buttons with the same silver ones I used on the cuffs and pockets.

Here are the results, with a few detail shots:


There is also a skirt that goes along with the jacket, and my girlfriend is trying to convince me to make it into a pair of shorts with the same velvet cuffs. We'll see...


8-Gore Skirt and Princess Line Blouse


One of the last projects in our first quarter patternmaking class was drafting a simple gored skirt. We took measurements of the person for whom we were making the skirt, and plugged them into a sort of formula to draft the pattern.

I made mine for my girlfriend out of a basic cotton print fabric. The skirt is fully lined with cotton sateen and has an invisible zipper in the side, closing at the waistband with two small buttons.


In our second quarter construction class, we made a princess line blouse from a pattern. We got to choose the size and fabric, but there was no patternmaking involved. We did, however, have to create a spec sheet, sequence of construction, and technical sketch. Again, I made it for my girlfriend. The grey panels are Kona cotton and the black panels are cotton sateen. The side seams are French seams.


Wednesday, June 30, 2010

First Quarter: Knock-off Skirt


This was the first big patternmaking project we had; create a skirt pattern (from our sloper) based on a magazine tear. Everyone brought in tears, and we all voted on which one we'd like to make. This Pringle of Scotland skirt was the winner.


We all had a first crack at it on our own, and then over the next few weeks we had some help refining our patterns.

My final pattern ended up looking like this. (The original skirt has pockets, but we turned those into pleats for the sake of simplicity.)


It is fully lined, with an invisible zipper in the back. The front has a
facing at the hem because of the curve produced by the tucks.

Once the pattern was perfected (or as close to perfect as it was going to get), we sewed it up in our construction class. We tried to use similar fabric to the original (though w
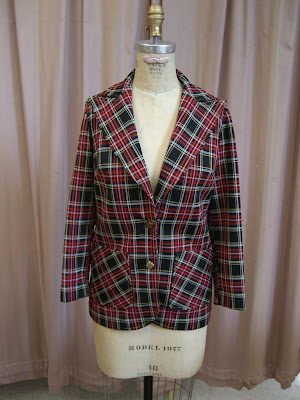
e could choose any color). Many of the other students used silk dupioni. I found a great Anna Sui remnant at Pacific Fabrics in SoDo, and it was even the right colorway! The only problem was that it was plaid. Plaid matching was not something we had been taught yet, but I was allowed to use the fabric as long as I could match it perfectly.

Here are the results:


Unfortunately, the matching doesn't quite work on the side seams, since the front piece is angled and the back is not. I was able to match them for a bit near the hem, though. The hem itself is hand blind stitched in placed, and matching thread was used depending on where in the plaid pattern the stitches happen to show.

Overall, I'm quite happy with how this project turned out. I learned a lot about problem-solving in patternmaking, and I really enjoyed sewing it up. This was the first time we got to sew something in fashion fabric (rather than muslin) that we had "designed", so it was fun to see it take shape. It's interesting looking back on it and think about how much work and time I put into it, when now I could probably whip up the pattern in an afternoon.

Sunday, May 16, 2010

Welcome to my portfolio!

Hi there!

My name is Chris Bolt, and this here is my portfolio. I'm currently studying Apparel Design at Seattle Central Community College, and will graduate in June 2011 with an AAS in Apparel Design.

This blog is where I'll be uploading pictures and information on the garments I've made, as well as technical drawings, color palettes, and other such apparel-related work.

Thanks for looking!